Java Soap Client Https Example
Learn to consume SOAP web services using spring boot soap client and auto client proxy class generation using JAXB maven plugin. Creating a SOAP web service is out of the scope of this tutorial, but you may learn it here.
Table of Contents Prerequisite Technology Stack Project Structure Create Spring Client using WebServiceTemplate Demo Summary
Read More: Create SOAP WS in Spring Framework
Prerequisite
Before running this example, we need one SOAP service ready which we will invoke from this client code. For this, you may download the attached maven project (at end of article) and run that in local workspace and use that.
Once you run this SOAP server project, you will get the WSDL from http://localhost:8080/service/studentDetailsWsdl.wsdl. Download the WSDL somewhere as studentDetailsWsdl.wsdl and later we will place this in resources/wsdl folder of the client project which we will create next to generate the client proxy code.
Technology Stack for Spring boot soap client
- JDK 1.8, Eclipse, Maven – Development environment
- Spring-boot – Underlying application framework
- maven-jaxb2-plugin plugin – for JAXB stub generation
- Spring-boot CommandLineRunner – To test the client code
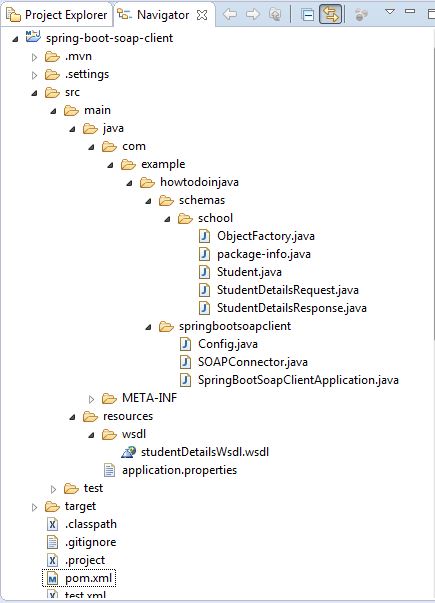
Project Structure
The classes and files created for this demo would look like below.
Create Spring Client using WebServiceTemplate
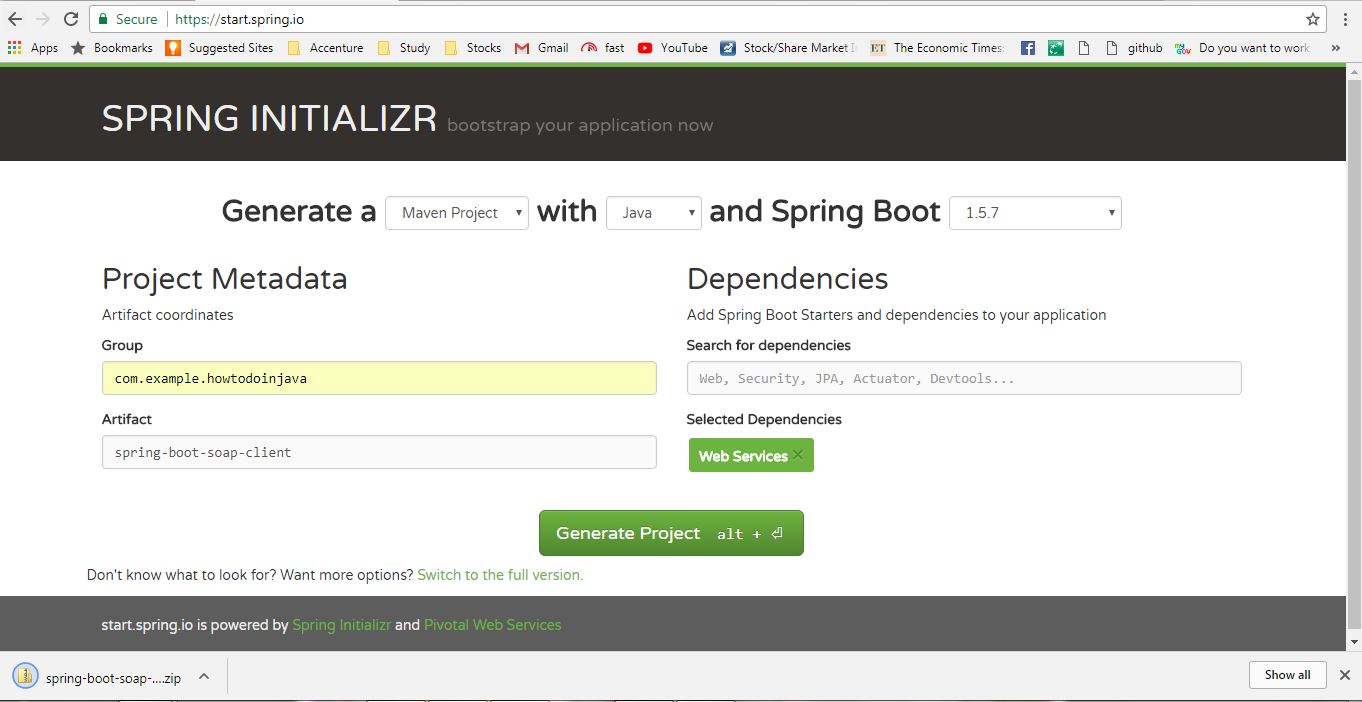
Create Boot Project
Create one spring boot project from SPRING INITIALIZR site with Web Services dependency only. After selecting the dependency and giving the proper maven GAV coordinates, download project in zipped format. Unzip and then import project in eclipse as maven project.
Generate SOAP Domain classes
Now use maven-jaxb2-plugin maven plugin to generate the JAXB annotated stub classes. To do that add this maven plugin in the pom.xml of the project.
<plugin> <groupId>org.jvnet.jaxb2.maven2</groupId> <artifactId>maven-jaxb2-plugin</artifactId> <version>0.13.2</version> <executions> <execution> <goals> <goal>generate</goal> </goals> </execution> </executions> <configuration> <generatePackage>com.example.howtodoinjava.schemas.school</generatePackage> <generateDirectory>${project.basedir}/src/main/java</generateDirectory> <schemaDirectory>${project.basedir}/src/main/resources/wsdl</schemaDirectory> <schemaIncludes> <include>*.wsdl</include> </schemaIncludes> </configuration> </plugin> This plugin will generate the classes in the com.example.howtodoinjava.springbootsoapclient package of src directory of the project and this plugin will check the generated timestamp of the classes so that those classes are generated only when any change in the WSDL happens.
Create SOAP client with WebServiceTemplate
Create a class called SOAPConnector.java which will act as a generic web service client for all the requests to the web service.
package com.example.howtodoinjava.springbootsoapclient; import org.springframework.ws.client.core.support.WebServiceGatewaySupport; public class SOAPConnector extends WebServiceGatewaySupport { public Object callWebService(String url, Object request){ return getWebServiceTemplate().marshalSendAndReceive(url, request); } } -
SOAPConnectorclass extendsWebServiceGatewaySupportwhich basically injects one interface with internal implementation ofWebServiceTemplatewhich is available bygetWebServiceTemplate()method. - We will use this
WebServiceTemplateto invoke the SOAP service. - This class also expects one injected spring bean called
MarshallerandUnmarshallerwhich will be provided by a configuration class which we will see next.
Spring bean configurations
Now we need to create one configuration class annotated with @Configuration which will have the required bean definitions required for the SOAPConnector to make this work properly.
package com.example.howtodoinjava.springbootsoapclient; import org.springframework.context.annotation.Bean; import org.springframework.context.annotation.Configuration; import org.springframework.oxm.jaxb.Jaxb2Marshaller; @Configuration public class Config { @Bean public Jaxb2Marshaller marshaller() { Jaxb2Marshaller marshaller = new Jaxb2Marshaller(); // this is the package name specified in the <generatePackage> specified in // pom.xml marshaller.setContextPath("com.example.howtodoinjava.schemas.school"); return marshaller; } @Bean public SOAPConnector soapConnector(Jaxb2Marshaller marshaller) { SOAPConnector client = new SOAPConnector(); client.setDefaultUri("http://localhost:8080/service/student-details"); client.setMarshaller(marshaller); client.setUnmarshaller(marshaller); return client; } } -
WebServiceGatewaySupportrequiresMarshallerandUnmarshaller, which are instances ofJaxb2Marshallerclass. - It uses
com.example.howtodoinjava.schemas.schoolas base package of the JAXB classes. It will use this package to create the JAXB context. - We will use this
Jaxb2Marshallerbean asMarshaller/UnmarshallerofSOAPConnectorbean.
Test with CommandLineRunner
For simplicity, We will create one Spring boot command line runner using which will load the spring context and invoke a handler method and will also pass the command line parameters to it. In realtime, we need to replace this command line runner with some other code which will be more aligned to the business.
We need to add this command line runner bean in the SpringBootApplication class as bellow.
package com.example.howtodoinjava.springbootsoapclient; import org.springframework.boot.CommandLineRunner; import org.springframework.boot.SpringApplication; import org.springframework.boot.autoconfigure.SpringBootApplication; import org.springframework.context.annotation.Bean; import com.example.howtodoinjava.schemas.school.StudentDetailsRequest; import com.example.howtodoinjava.schemas.school.StudentDetailsResponse; @SpringBootApplication public class SpringBootSoapClientApplication { public static void main(String[] args) { SpringApplication.run(SpringBootSoapClientApplication.class, args); } @Bean CommandLineRunner lookup(SOAPConnector soapConnector) { return args -> { String name = "Sajal";//Default Name if(args.length>0){ name = args[0]; } StudentDetailsRequest request = new StudentDetailsRequest(); request.setName(name); StudentDetailsResponse response =(StudentDetailsResponse) soapConnector.callWebService("http://localhost:8080/service/student-details", request); System.out.println("Got Response As below ========= : "); System.out.println("Name : "+response.getStudent().getName()); System.out.println("Standard : "+response.getStudent().getStandard()); System.out.println("Address : "+response.getStudent().getAddress()); }; } } Here we are taking the search parameter from command line, and creating the StudentDetailsRequest object and using SOAPConnector we are invoking the SOAP web service.
Few Optional Configurations
Open application.properties and add below configurations
server.port = 9090 logging.level.org.springframework.ws=TRACE
Here we are overriding the default port to 9090 by server.port = 9090 as you have already noticed that our sample SOAP service runs in default port 8080 as two java process can't run in same port.
Also we are enabling TRACE logging for the org.springframework.ws package by logging.level.org.springframework.ws=TRACE. This will print the SOAP payloads in the console.
That's all we need to do for consuming a SOAP service using Spring boot, Now it is time for testing.
Demo
Now build the application using maven command mvn clean install. We can invoke the command line runner by command java -jar target\spring-boot-soap-client-0.0.1-SNAPSHOT.jar Lokesh from the command prompt.
Please note, we are passing one command line parameter "Lokesh" here which will be used in the lookup method of the CommandLineRunner bean. If no name is passed we have passed one default name in that method.
Once command line runner will be invoked, we should see the SOAP service output and the response is properly unmarshalled to the JAXB object StudentDetailsResponse. Also, we can see the full SOAP request/response in the TRACE log as below.
output
2017-10-09 23:20:45.548 TRACE 9204 --- [ main] o.s.ws.client.MessageTracing.received : Received response [<SOAP-ENV:Envelope xmlns:SOAP-ENV="http://schemas.xmlsoap.org/soap/envelope/"><SOAP-ENV:Header/><SOAP-ENV:Body><ns2:StudentDetailsResponse xmlns:ns2="http://www.howtodoinjava.com/xml/school"><ns2:Student><ns2:name>Sajal</ns2:name><ns2:standard>5</ns2:standard><ns2:address>Pune</ns2:address></ns2:Student></ns2:StudentDetailsResponse></SOAP-ENV:Body></SOAP-ENV:Envelope>] for request [<SOAP-ENV:Envelope xmlns:SOAP-ENV="http://schemas.xmlsoap.org/soap/envelope/"><SOAP-ENV:Header/><SOAP-ENV:Body><ns2:StudentDetailsRequest xmlns:ns2="http://www.howtodoinjava.com/xml/school"><ns2:name>Sajal</ns2:name></ns2:StudentDetailsRequest></SOAP-ENV:Body></SOAP-ENV:Envelope>] Got Response As below ========= : Name : Lokesh Standard : 6 Address : Delhi
Summary
In this SOAP tutorial, we learned how we can consume SOAP service from spring boot soap client easily. You can use this approach whenever you have any requirement to consume any such SOAP service. Hope this will be useful for you.
Please add your feedback in the comments section.
Happy Learning !!
Source: https://howtodoinjava.com/spring-boot/spring-soap-client-webservicetemplate/
0 Response to "Java Soap Client Https Example"
Post a Comment